Learn · Plumbing
Fixture Requirements and Clearances
Part of Journeyman Plumber Exam Prep · step 26 of 31 · next: Testing and Inspection Requirements
In learning paths: Journeyman Plumber Exam Prep
Assumes you know: UPC vs IPC: The Two Model Codes
Fixture requirements answer two different questions with two different tools: how many fixtures a building must have, answered by minimum fixture count tables, and how much space each fixture must be given, answered by clearance rules. The counts and dimensions vary by code and edition, so this lesson teaches the method for reading them and the typical values you will sanity-check against.
Why it matters on the job
Fixture counts decide whether a tenant build-out needs one restroom or four, which can decide whether the project happens at all. Clearances decide whether the powder room the architect drew can actually be built. Both get checked at plan review, but the plumber who catches an impossible layout at bid time, or a missing fixture before rough-in, saves the job weeks. This is the code chapter where plumbing meets floor plans.
Counting fixtures: the method
Minimum fixture counts live in a table that maps occupancy to required fixtures. The method is the same in every code:
- Classify the occupancy. Office, mercantile, assembly, school: the categories come from the building code and carry into the plumbing table.
- Establish the occupant load. Plan review uses the building code’s occupant load calculation, people per square foot by use. You inherit this number from the plans; know where it comes from.
- Read the table. Each row gives fixtures required per number of occupants, for water closets, lavatories, drinking fountains, and service sinks. Ratios step: one fixture per some number of occupants, with the ratio often changing above a threshold.
- Apply the splitting rules. Codes divide occupants between sexes, typically 50/50 unless shown otherwise, round fractional fixtures up, and set when separate facilities are required at all: small occupancies below a threshold occupant count may be allowed a single shared restroom.
The ratios and thresholds differ between the UPC and IPC and between editions, which is why the method is what you memorize and the table is what you look up.
Spacing fixtures: typical clearances
Clearances protect the user’s elbows and the next plumber’s wrench. The recurring, code-typical figures:
- Water closet side clearance: 15 in from the fixture centerline to any side wall, partition, or vanity, which makes 30 in of clear width for the fixture.
- Fixture spacing: 30 in center to center between adjacent fixtures.
- Clearance in front of a water closet: commonly 21 in, with 24 in required in some codes and layouts.
Treat these as the standard residential-scale pattern and confirm your code’s numbers. Accessible fixtures under ADA and ANSI A117.1 are a separate, larger geometry entirely: an accessible water closet centerline is set in a specified range from the wall, not a minimum, and compliance is measured to fractions of an inch.
Worked example
An architect shows a powder room 4 ft 2 in wide with the water closet on the back wall, its centerline 14 in from the side wall, and 20 in from the bowl front to the door.
- Side clearance: 14 in centerline to wall is less than the typical 15 in minimum. Fail. Shifting the centerline to 15 in leaves 50 − 15 = 35 in to the other wall: passes with room for the lavatory check.
- Front clearance: 20 in is less than the typical 21 in. Fail by an inch, and an inch is enough to lose at inspection after tile.
- The fix at plan stage is moving a wall 2 in. The fix after rough-in is moving a flange, a stack, and a tile floor. Same math, very different invoice.
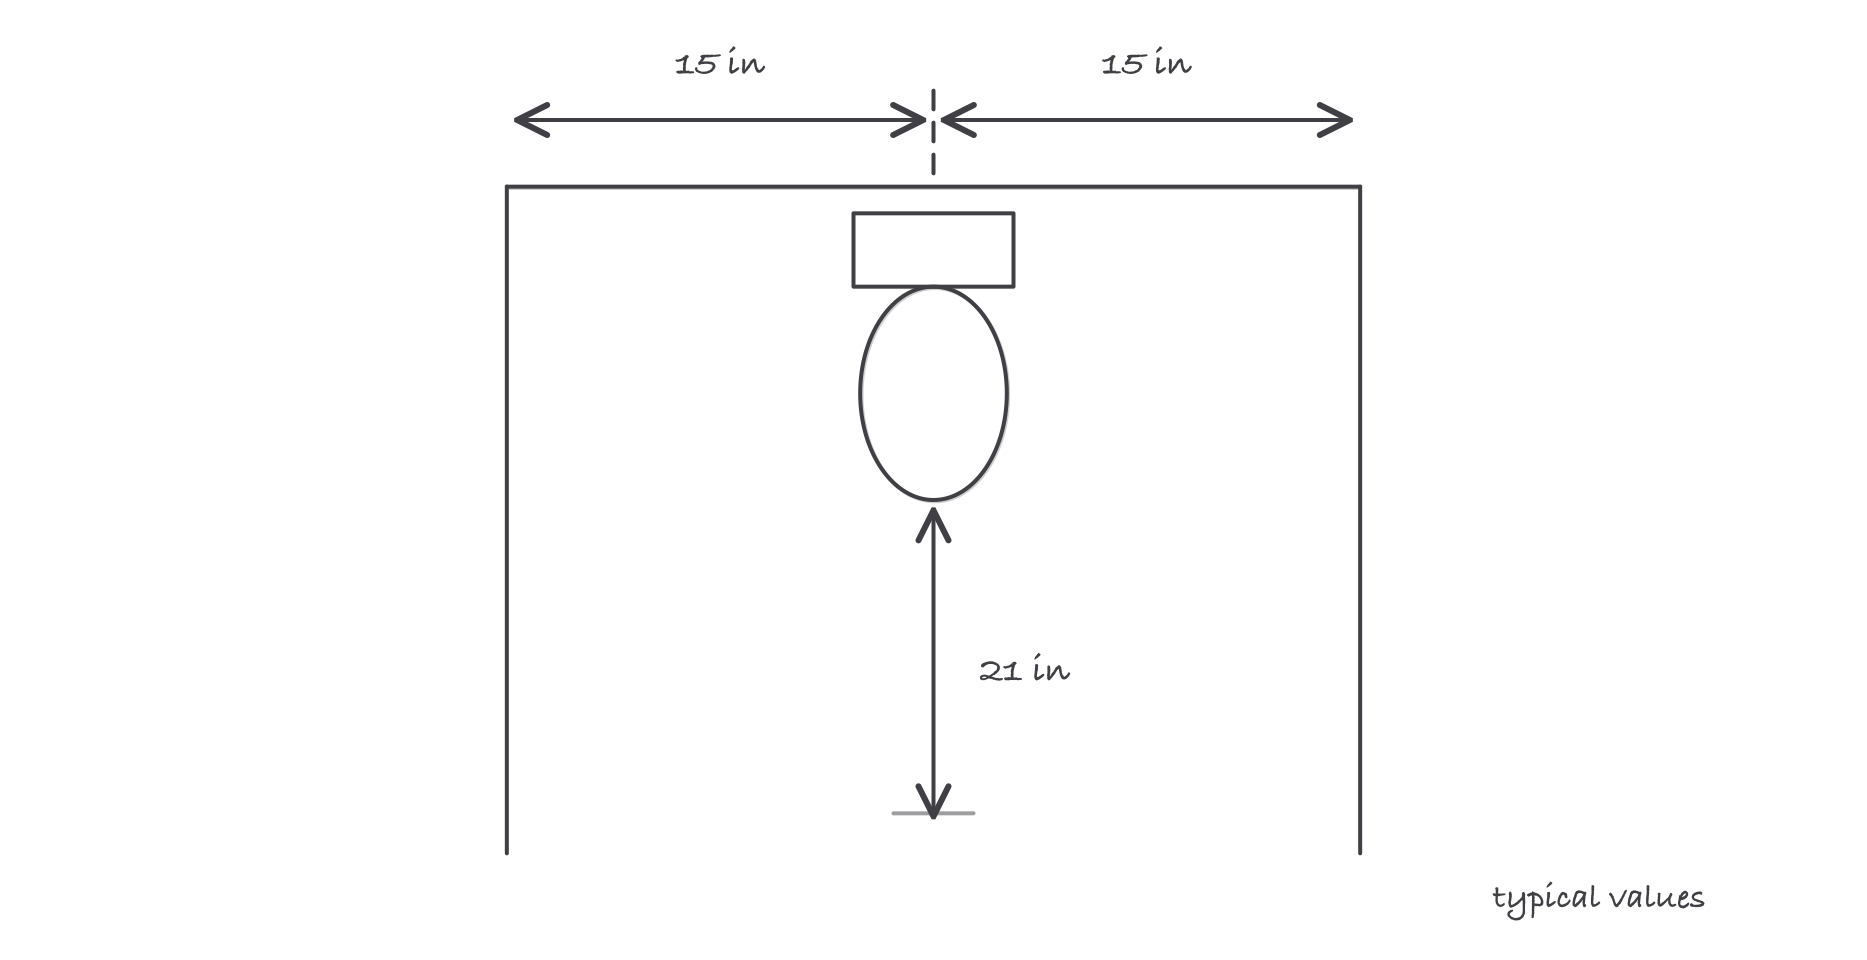
The clearance box every water closet must own: side dimensions from the centerline, front dimension from the bowl
Where it bites
- Measuring side clearance from the tank, not the centerline. The 15 in figure is centerline to obstruction. Measured from porcelain edges the layout looks fine and roughs in wrong.
- A vanity is an obstruction. The side clearance is to walls, partitions, and fixtures alike. A wide vanity crowding the water closet fails the same 15 in rule a wall would.
- Counting fixtures without the splitting rules. The table ratio is only step one; sex separation, rounding up, and single-restroom allowances change the final count, in either direction.
- Forgetting accessibility overlays. A room can pass plumbing clearances and fail accessibility by a foot. On commercial work, the accessible geometry governs the layout, so check it first, not last.
Exam relevance
Journeyman exams love clearance arithmetic: given a room width, does the fixture fit, with 15 in, 30 in, and 21 in as the recurring answers. Master and contractor exams shift to the counting method: classify the occupancy, apply the ratio, split and round correctly. Either way, examiners test the method against the specific table in the exam’s code, so practice with the edition your exam names.
Verified requirements
| Where | Expires | Renewal | Continuing education |
|---|---|---|---|
| Texas | Confirm with issuer | Confirm with issuer | Confirm with issuer |
| Texas | Confirm with issuer | Confirm with issuer | Confirm with issuer |
| Illinois | Confirm with issuer | Confirm with issuer | Confirm with issuer |
Information comes from issuing-authority sources. Confirm current rules, fees and eligibility with the authority before acting.