Learn · Carpentry
Wall Framing
Part of Carpenter, Frame to Finish · step 7 of 30 · next: Roof Framing and Rafter Math
In learning paths: Carpenter, Frame to Finish
Assumes you know: Framing Fundamentals
A framed wall is a layout problem first and a carpentry problem second. Once the plates are marked correctly, building the wall is repetition. Mark them wrong and every stud, every sheet of sheathing and every fixture that lands on that wall inherits the error.
Why it matters on the job
Wall layout is the instruction set the rest of the building follows. Sheathing needs a stud under every panel edge. Drywall needs the same. Electricians and plumbers plan their runs around the bay spacing, and cabinet installers hunt for studs behind finished walls with a magnet, trusting that whoever framed it held the layout.
Walls are also where fall exposure begins. Standing walls on an upper floor or a deck puts you near open edges, and under construction rules 29 CFR 1926.501 requires fall protection at 6 feet above a lower level.
The parts of a wall
Plates run horizontally: one bottom plate, and a top plate that is normally doubled so the upper member can lap the joints and tie intersecting walls together.
Studs run vertically between the plates at a regular spacing.
Header spans each opening. It bears on a trimmer stud (also called a jack stud) at each end, and the trimmers bear on the bottom plate. A king stud runs full height beside each trimmer and ties the assembly to the plates.
Cripple studs are the short studs above a header or below a rough sill. They continue the stud layout through the opening so the sheathing and drywall still find framing.
Corners and partition intersections need backing: framing arranged so that drywall on the inside face has something to fasten to. A corner built without backing looks fine until the drywall crew arrives.
Layout: the 15 1/4 rule
Studs go 16 in or 24 in on center, and on center means center to center. The spacing is not arbitrary. A 4 ft panel is 48 in wide, and 48 divides evenly by both 16 and 24.
Here is the part that catches every apprentice. If you hook your tape on the end of the plate and mark 16 in, then set a stud with its edge on that mark, the stud’s center sits at 16 3/4 in and every panel edge misses. So you pull 15 1/4 in for the first mark, set the stud edge there, and its center lands at 15.25 + 0.75 = 16 in. Every mark after that is a clean 16 in.
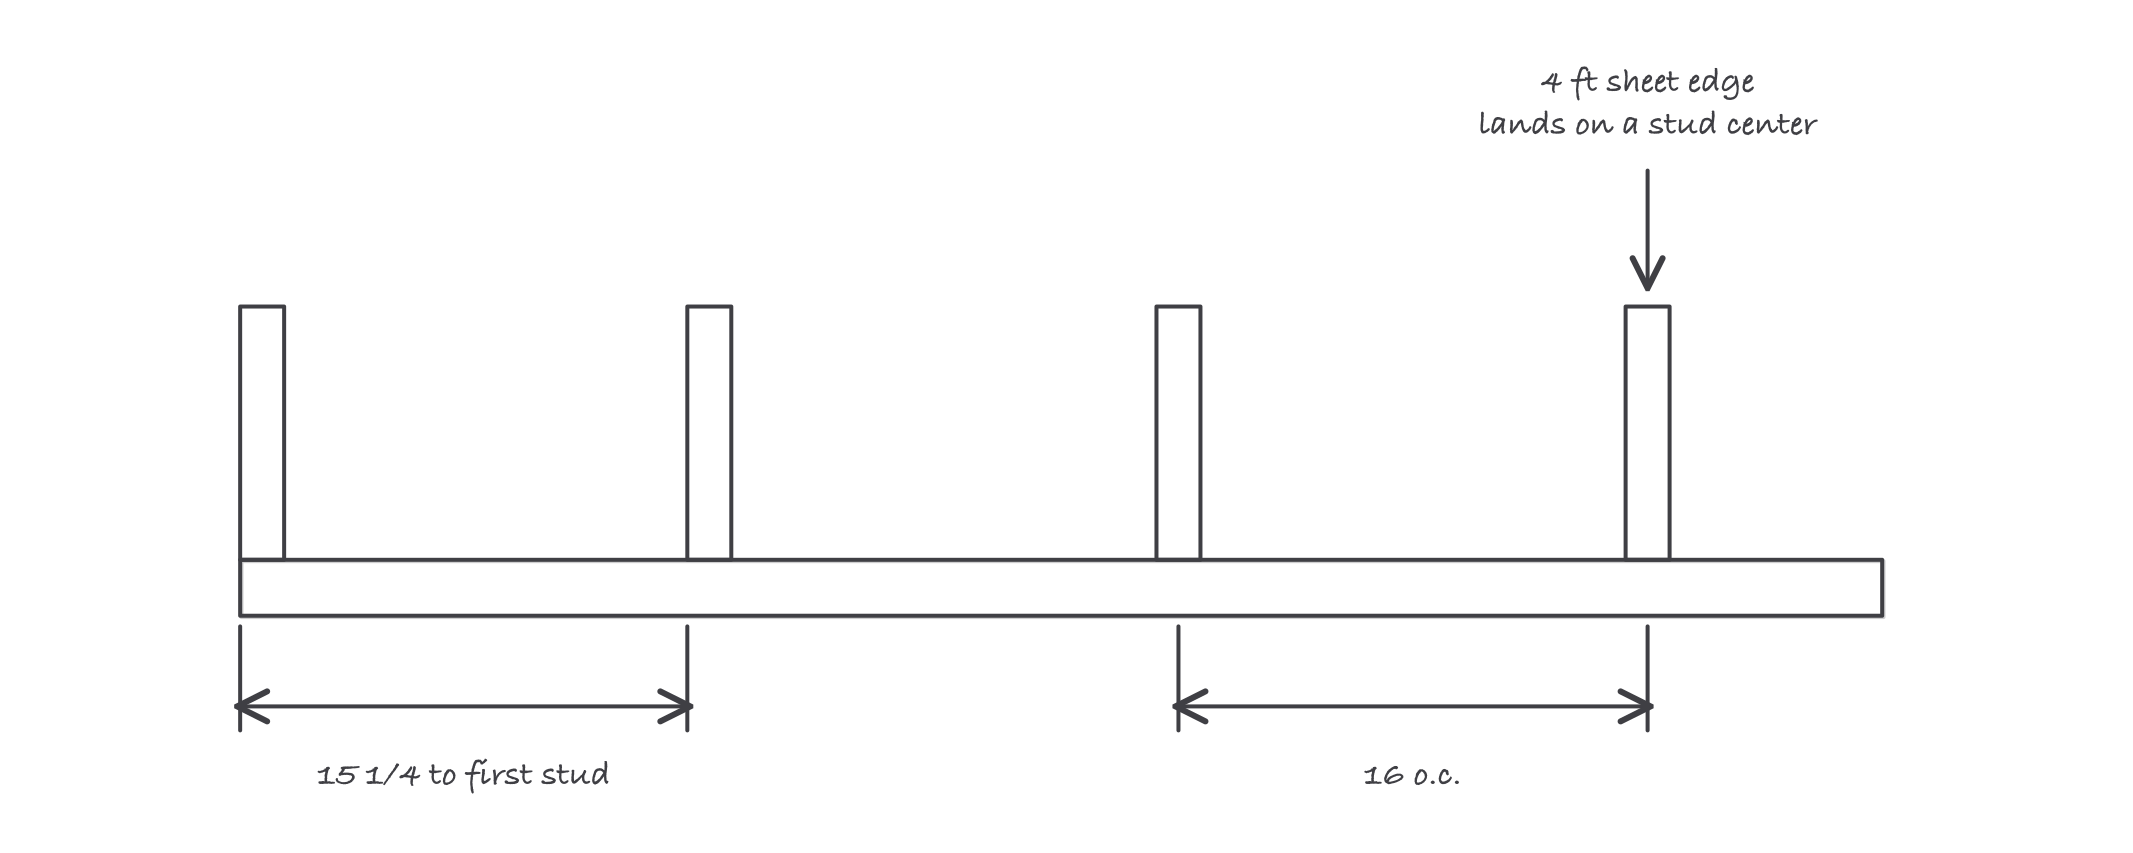
The 15 1/4 in first mark is what puts every stud center on a multiple of 16
Lay out both plates at once. Cut them to length, stand them on edge side by side, square across both with one pencil stroke, and they can never disagree. Run the tape from one end for every mark. Never measure stud to stud with a block, because a block collects a saw kerf and a pencil width at every bay, and by the far end you are a full stud off.
Worked example: a 12 ft wall
The wall is 12 ft long, studs 16 in on center, sheathed with 4 ft panels.
- Plate length: 12 × 12 = 144 in.
- First mark: 15 1/4 in, putting that stud’s center at 16 in.
- Marks continue at 31 1/4, 47 1/4, 63 1/4, 79 1/4, 95 1/4, 111 1/4 and 127 1/4 in, so the centers are 32, 48, 64, 80, 96, 112 and 128 in. That is 8 laid-out studs.
- Add a stud flush at each end of the plate: 8 + 2 = 10 studs, before any extras.
- Extras are counted separately: king studs, trimmers and cripples at every opening, plus backing at corners and partition intersections.
Now check the sheathing. Panel edges fall at 0, 48, 96 and 144 in. The studs centered at 48 and 96 catch two of those seams with 3/4 in of bearing on each side, and the flush end studs catch the other two. Three panels cover the wall with every edge on framing, which is exactly what the 15 1/4 in mark bought you.
Clear space in each bay is 16 − 1.5 = 14.5 in. That is the number a plumber needs, and it is not 16.
Where it bites
- Measuring the gap instead of the center. An apprentice who sets 16 in of clear space between studs drifts one stud width per bay, and by the fourth panel the seam has no framing under it.
- Headers need bearing, not only length. The trimmer under each end is what carries the header’s load to the plate. Nailing a header between king studs with no trimmer transfers load through fasteners in shear, which is not how the assembly was designed.
- Sheathing squares the wall, so square it first. Build the wall flat on the deck, measure both diagonals, adjust until they match, then sheath. Sheathing locks in whatever shape it finds, including a racked one.
- A standing wall is not stable until it is braced. Temporary bracing stays on until the diaphragm is complete. Walls have come down on people between stand-up and sheathing.
- Header sizes and stud heights come from the adopted code, not from the last job. Model code editions differ, jurisdictions amend them, and a size that passed across the county line may not pass here.