Learn · Carpentry
Wall and Column Forms
Part of Carpenter, Frame to Finish · step 12 of 30 · next: Form Pressures and Failure Prevention
In learning paths: Carpenter, Frame to Finish
Assumes you know: Formwork Fundamentals
Vertical forms have to do two things at once: hold a shape accurately enough that the finished concrete is where the drawings put it, and resist a lateral pressure that is trying to spread them apart. Almost every decision in wall and column forming is a trade between those two.
Why it matters on the job
A wall form that is stiff but out of position gives you a straight wall in the wrong place. A form that is in position but not stiff enough gives you a bellied wall, a blowout, or both. The layout work from site layout carries straight through here, and so does the load chain from formwork fundamentals.
The parts of a wall form
Form face: plywood, prefabricated panels or steel, sized and spliced so the joints fall where the drawings say.
Studs (sometimes called strongbacks or soldiers): vertical members directly behind the face, spanning between walers.
Walers: horizontal members spanning across the studs, usually doubled so a tie can pass between the two pieces.
Form ties: steel members through the wall that hold the two faces at the correct spacing and take the tension from the concrete pressure. Ties do two jobs at once (spacing and restraint), and they come with a rated working load that is a design value, not a suggestion.
Bracing: external, usually diagonal to the ground or to a deck, and it is what resists wind and the shove of placement equipment. Bracing is not what resists concrete pressure; the ties do that.
Alignment members: strongbacks or a top waler pulled straight with a string line, which is what makes the wall read straight to the eye.
Column forms work the same way with a different geometry
A column has four faces and no length to spread the load along, so instead of walers and ties, most column forms use yokes or column clamps that wrap the form entirely and take the pressure in a closed loop.
Because a column is usually placed fast from the top, the pressure at its base is high, and clamp spacing tightens as you go down. That varying spacing is on the drawings. It is not a place to average.
Building the form in the right order
- Set the layout and check it against the string lines and the diagonals, before anything vertical goes up.
- Set one face, plumb and brace it, and treat that as the reference face for the whole pour.
- Place reinforcement, embeds, blockouts and sleeves while both faces are still open.
- Close the second face, install ties, and bring the walers up in the sequence the drawings show.
- Brace, then pull the top alignment with a string line and adjust.
- Walk the whole form and confirm the tie count and pattern against the drawings before the truck arrives.
Worked example: counting the tie work
The form drawings for an 8 ft tall, 40 ft long wall call for walers at 24 in on center starting 12 in above the base, with ties at 24 in on center along each waler.
- Waler heights: 12, 36, 60 and 84 in above the base, which is 4 walers per face.
- Tie positions along a 40 ft waler: 40 × 12 = 480 in, and 480 ÷ 24 = 20 spaces, so 20 + 1 = 21 ties per waler line.
- Total ties in the wall: 4 × 21 = 84 ties.
- Form face to build: 2 × 40 × 8 = 640 sq ft, matching the pour from the previous lesson.
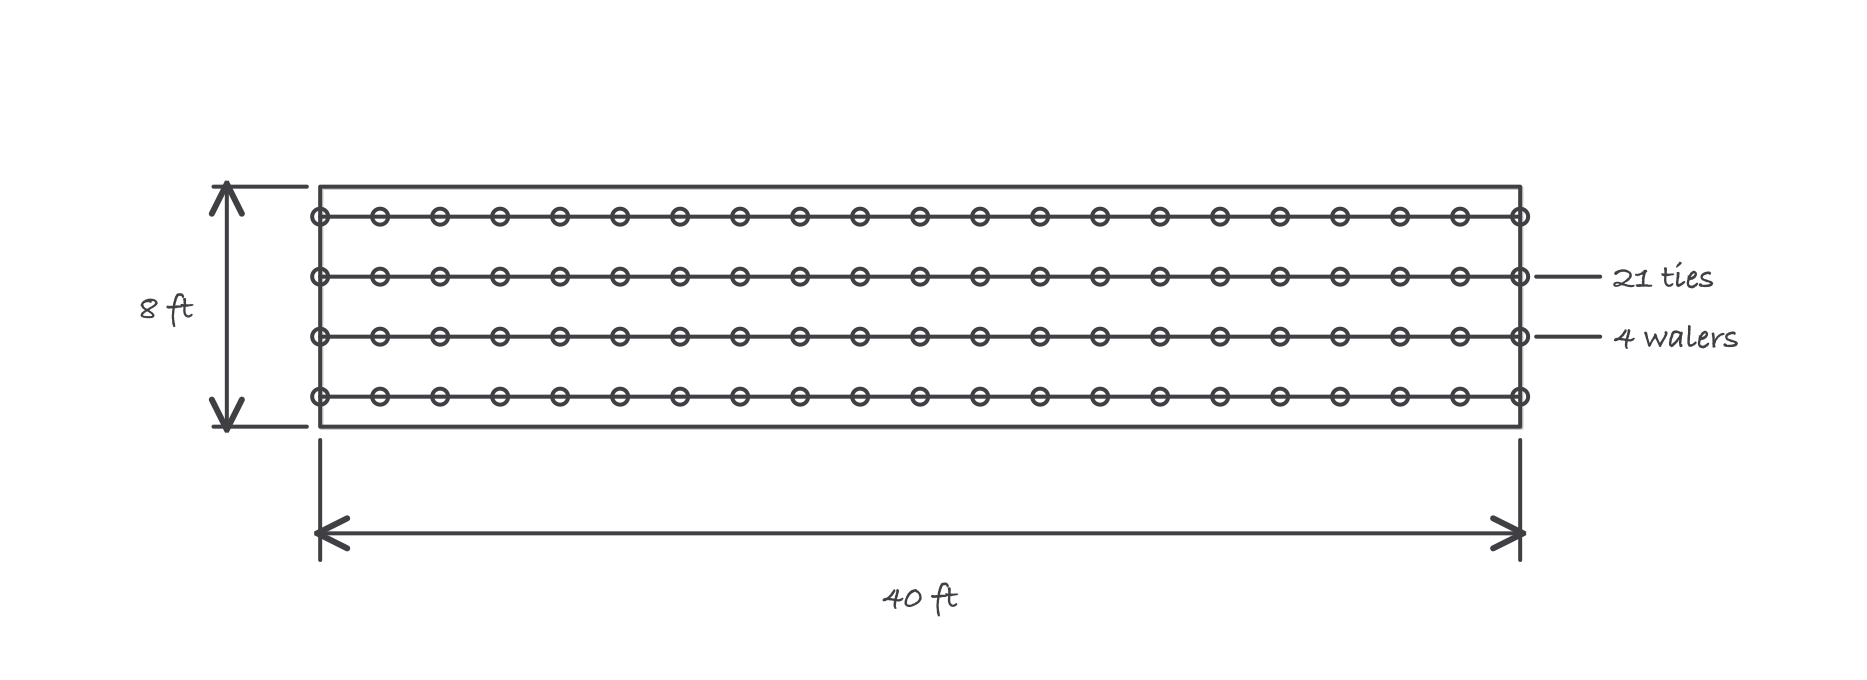
Count the ties off the drawings and check them on the form before the truck arrives, not during the pour
Eighty four ties is roughly two hours of work for two people, and it is the difference between a wall and a mess. Count them twice.
Where it bites
- Ties resist pressure; braces resist wind and impact. Crews that add bracing because a form looks light have not addressed the load that actually threatens it.
- A missing tie is not one eighty-fourth of a problem. The neighboring ties pick up its share, and the form face between them spans twice as far, so a single gap concentrates load exactly where the face is now weakest.
- Tie spacing on the drawings usually tightens toward the base. Pressure is highest at the bottom, so an even grid is not always what is specified. Build what is drawn.
- Reference one face and one string line. Setting each face independently plumb produces a wall of the wrong thickness that is plumb on both sides.
- Everything that has to be inside the wall goes in before the second face closes. After that it is a demolition job.