Learn · Sheet Metal
Pattern Development and Layout
Part of Sheet Metal to TAB Certified · step 2 of 23 · next: Fabricating Fittings and Transitions
In learning paths: Sheet Metal to TAB Certified
Assumes you know: Sheet Metal: Gauges, Materials, Tools
A pattern is the flat shape that, once cut and formed, becomes the fitting. Developing it means unwrapping a three-dimensional object onto a plane without stretching anything, and there are exactly three methods for doing it. Knowing which method a given shape calls for is most of the skill, because a shape developed by the wrong method produces a pattern that will not close.
Why it matters on the job
Fittings are the parts a shop actually makes. Straight duct comes off a line, but the elbow, the offset, the transition and the tap are laid out by someone who can turn a dimensioned sketch into a blank. A pattern that is a quarter inch short does not reveal itself at the layout table; it reveals itself when two halves refuse to meet and the metal is already cut.
The three methods, and how the shape picks one
Look at the elements of the shape, meaning the lines that run along its surface from one end to the other.
- Parallel line is for shapes whose elements are parallel to each other: cylinders and prisms. Straight round pipe, mitered elbow gores, rectangular duct sections. The pattern is a stretch-out line with a perpendicular ordinate at each division, each one carrying its own height.
- Radial line is for shapes whose elements all converge on a single apex: cones and pyramids. The pattern is swung from that apex with a compass or a trammel, which is where the name comes from.
- Triangulation is for shapes with neither parallel elements nor a common apex, which in duct work means transitions. Square-to-round, rectangle-to-rectangle offsets, anything where the two ends are different shapes or are not concentric. The surface is broken into triangles and each triangle’s true lengths are found before the pattern is stepped out.
The test is quick. Parallel elements, use parallel line. Elements meeting at one point, use radial line. Neither, triangulate.
The stretch-out
The stretch-out is the true distance around the shape, laid out flat. For round work it is the circumference, so a 14 inch diameter pipe has a stretch-out of π × 14 = 43.98 inches.
Two habits keep it honest. First, take the stretch-out on the neutral line (roughly the middle of the metal’s thickness) rather than the outside surface. On light gauge the difference is small; on heavy gauge it accumulates around a girth and shows up as a seam that will not close. Second, seam and edge allowances are added to the stretch-out, never carved out of it. The girth is the finished size, and the blank is bigger.
Worked example: a 14 inch pipe cut at 45 degrees
You need the pattern for a round pipe, 14 inches in diameter, cut off at 45 degrees to its axis, with the short side finishing at 3 inches tall.
Step 1, the stretch-out. π × 14 = 43.98 inches.
Step 2, divide it. The convention is 12 equal spaces, matched to 12 equally spaced points around the plan view of the pipe. 43.98 / 12 = 3.665 inches per space.
Step 3, find the heights. With a 45 degree cut, the height at any point is the mean height plus the radius times the cosine of that point’s angle. Radius is 7 inches, and with the short side at 3 inches the mean height is 3 + 7 = 10 inches. So height = 10 + 7 cos θ:
- 0 degrees (the long side): 10 + 7(1.000) = 17.00 in
- 30 degrees: 10 + 7(0.866) = 10 + 6.06 = 16.06 in
- 60 degrees: 10 + 7(0.500) = 10 + 3.50 = 13.50 in
- 90 degrees (the sides): 10 + 7(0.000) = 10.00 in
- 120 degrees: 10 - 3.50 = 6.50 in
- 150 degrees: 10 - 6.06 = 3.94 in
- 180 degrees (the short side): 10 - 7.00 = 3.00 in
The second half of the pattern mirrors the first, so those seven numbers give you all thirteen ordinates.
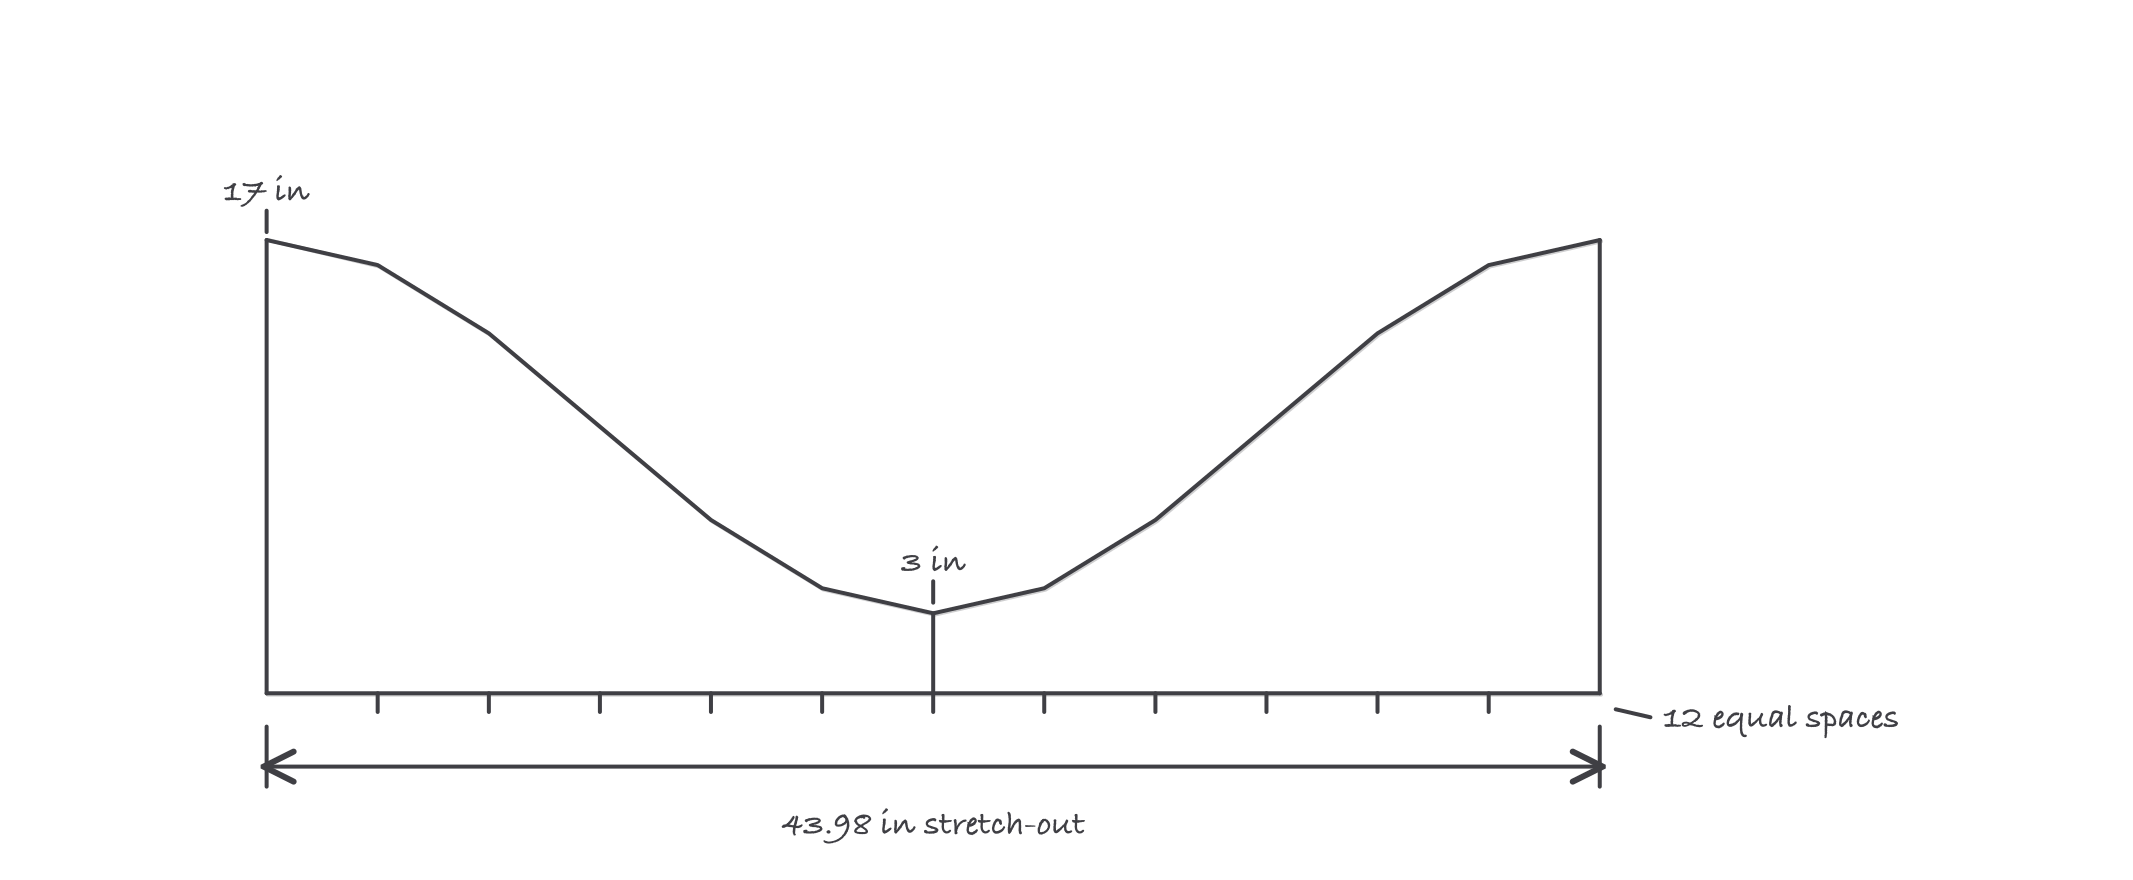
The pattern for the pipe: heights vary along a fixed stretch-out
Step 4, check it. A 45 degree cut rises exactly one diameter across the pipe, because the rise equals D × tan 45 and tan 45 is 1. Sure enough, 17.00 - 3.00 = 14.00 inches, the diameter. If your longest and shortest ordinates do not differ by that amount, stop and find the error before you transfer anything to metal.
Where it bites
- The ordinates on the pattern must be the same points as the ordinates on the elevation. If your plan view is divided into 12 and your stretch-out into 16, every height is wrong even though every individual measurement was taken correctly.
- The girth is not the blank. Seam allowance, edge hems and any locks all get added afterward, and forgetting them is how a first pattern comes up short.
- The method is a property of the shape, not a preference. Trying to develop a square-to-round with parallel line does not give an approximate pattern. It gives a wrong one.
- Symmetry hides errors. Because half the pattern mirrors the other half, a mistake made once gets copied twice and looks deliberate. Check the extremes against a known relationship (as above) rather than eyeballing the curve.