Learn · Heavy Equipment
Reading Load Charts
Part of CCO Crane Operator Prep · step 10 of 21 · next: Crane Setup and Ground Conditions
In learning paths: CCO Crane Operator Prep
Assumes you know: Crane Types and Configurations
A load chart states what one crane, in one exact configuration, can lift at each combination of boom length and load radius. Reading it is a fixed sequence: configuration first, then radius, then the capacity cell, then the deductions that turn the chart’s gross number into what can actually hang on the hook.
Why it matters on the job
The chart is the manufacturer’s engineering handed to the operator, and a crane accident report that mentions “capacity” usually comes back to a chart misread: the wrong configuration page, a guessed radius, or a gross number treated as net. Chart problems are also the arithmetic backbone of CCO certification exams. An operator who reads charts in the right order, every time, has eliminated most of the ways a lift plan goes wrong.
Configuration first
Every page of the chart is conditional: on outriggers fully extended, with this counterweight, this boom and jib arrangement. The numbers on one page say nothing about any other setup. On rubber (on tires) has its own chart, and pick and carry is its own chart too, with drastically lower, often speed-limited capacities. It is not the outrigger chart minus a little.
So the first read is not a number but a match: does the machine in front of you, as it is actually set up, match the page you are about to read? If the outriggers are at an intermediate position and the page says fully extended, you are on the wrong page.
Radius, not boom length
Capacity is a function of load radius: the horizontal distance from the crane’s center of rotation to the load hook. Not boom length, not boom angle. Two lifts with the same boom length at different radii can differ in rated capacity many times over, which is why the radius column decides the lift and boom length alone never does.
Radius is measured loaded, because the boom deflects under load and the hook moves outward. A lift planned at one radius arrives at a longer one the moment the load comes off the ground. And when your radius falls between two chart rows, use the larger radius row: the chart is never interpolated in your favor.
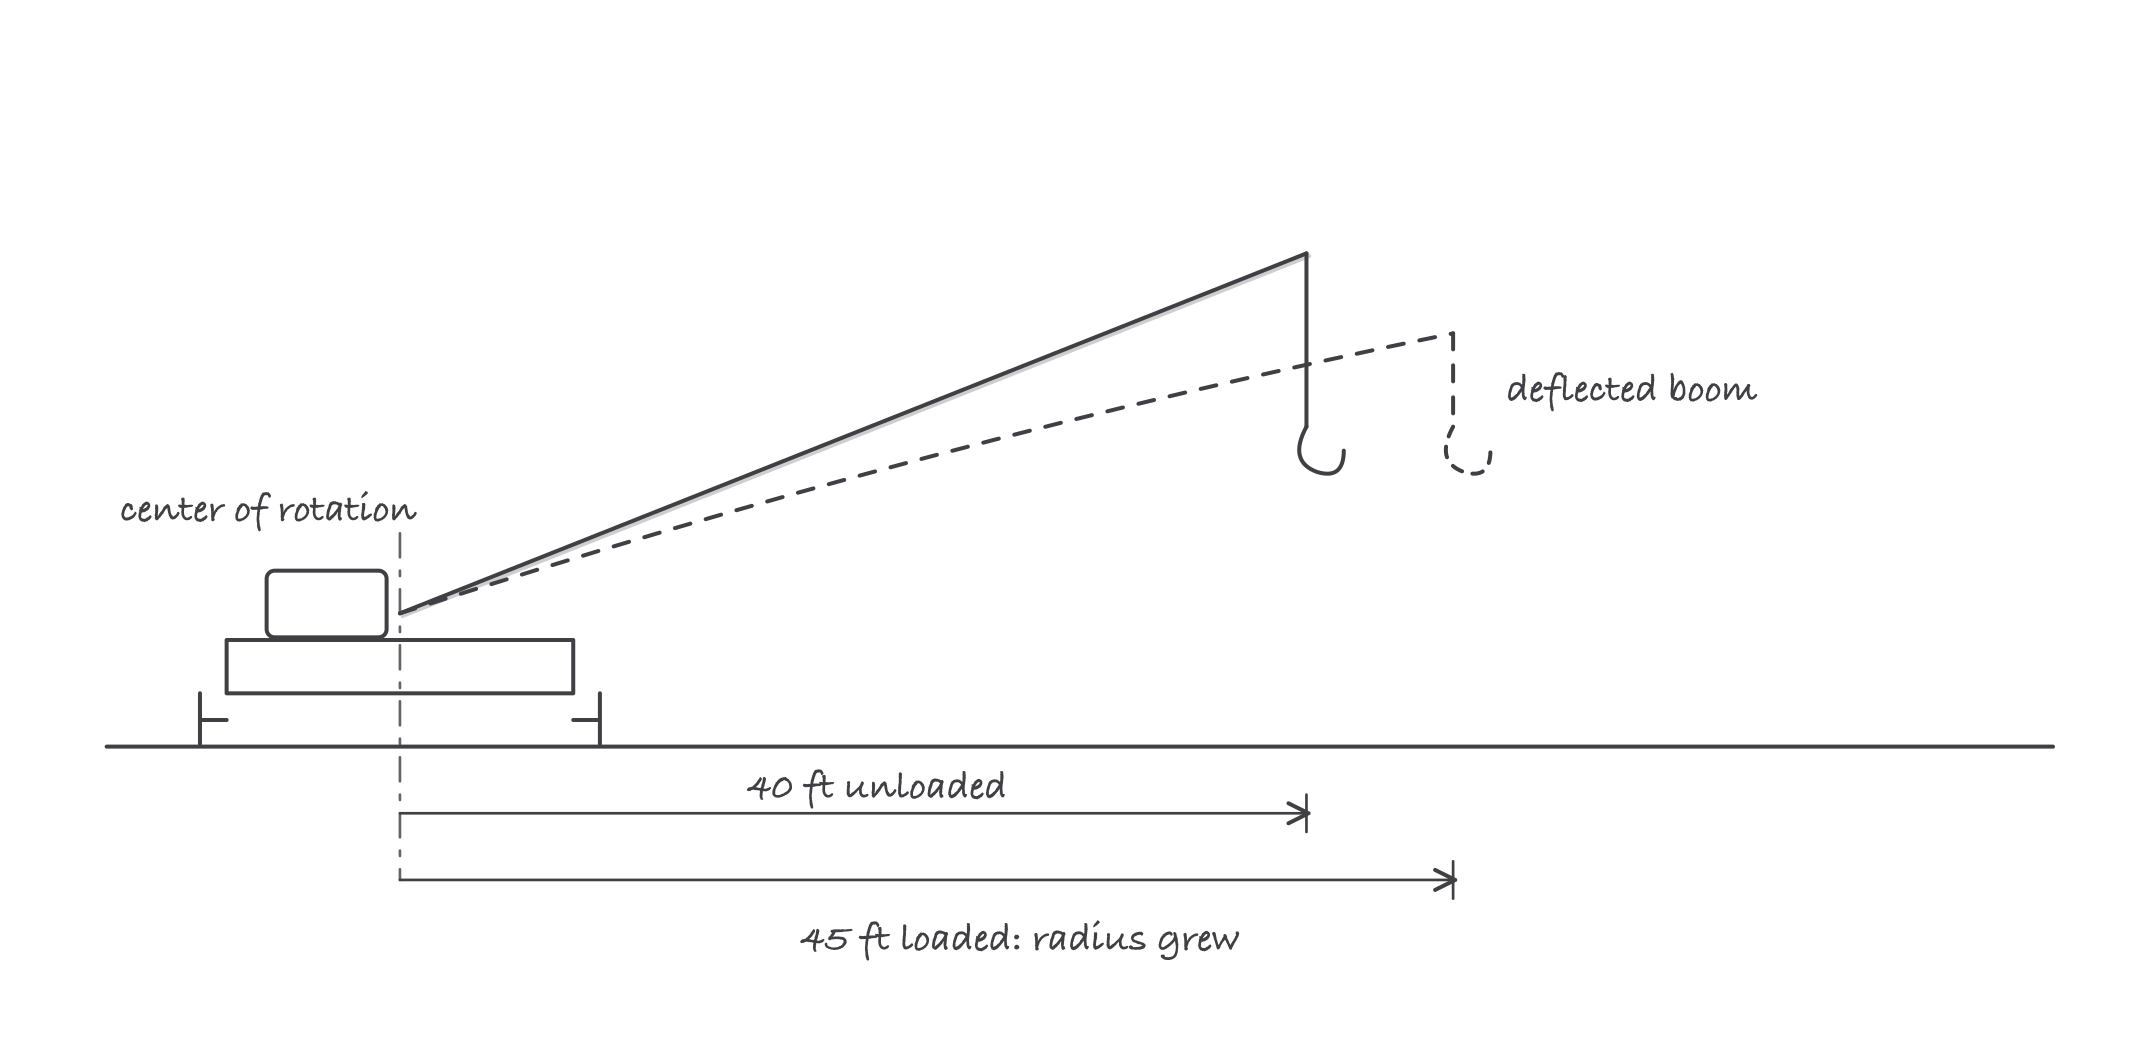
Radius runs from the centerline of rotation to the hook, and it grows when the boom deflects under load
Gross to net
The chart number is gross capacity, and the load is not the only thing the crane is lifting. Everything between the boom tip and the load deducts from the chart number before the load does: the hook block or headache ball, slings and rigging hardware, and, per the chart’s notes, a stowed or erected jib. What remains is net capacity, the number the load must beat.
Tipping limit and structural limit
Every chart cell is governed by one of two failure modes, and the chart marks the boundary (commonly a bold line or asterisk region). In the tipping-governed zone, overload tends toward instability. In the structurally governed zone, the limit is the strength of the boom and components, and an overload there gives no tipping warning before something breaks. “You’ll feel it get light first” is folklore, and in the structural zone it is deadly folklore.
Worked example: one pick, gross to net to radius creep
Chart cell, outriggers fully extended, full counterweight, 40 ft radius: 40,000 lb gross.
- Deductions: hook block 700 lb, slings and shackles 150 lb. Total 850 lb.
- Net capacity: 40,000 − 850 = 39,150 lb.
- The load weighs 36,000 lb: 36,000 / 39,150 = 0.9195, so the pick is at 92 percent of net capacity. Legal, and with little margin.
- Now the boom deflects and the load drifts to a 45 ft radius, where the chart reads 34,000 lb gross: net 34,000 − 850 = 33,150 lb. The same 36,000 lb load is now an overload at 108.6 percent (36,000 / 33,150 = 1.086).
Five feet of radius turned a legal lift into an overload with nothing else changing. That is why radius is measured loaded, and why tight-margin picks get a lift plan instead of confidence.
Where it bites
- Quote net, never gross. The deductions come off first, every time.
- The right number from the wrong page is still wrong. Configuration mismatch (outrigger position, counterweight, jib state) invalidates every cell on the page.
- Boom angle is not radius. Guessing radius from the angle indicator ignores deflection and load drift; measure it.
- Between rows, round against yourself. Longer radius row, lower capacity, always.
- The structural zone does not negotiate. Past the chart’s boundary marking, stability instinct tells you nothing. The number is the only warning you get.
Exam relevance
CCO mobile crane written exams, Core and every specialty, lean hard on exactly this sequence: identify the governing configuration, find the cell, apply deductions, decide whether the lift is within capacity. The practical exam expects you to consult the test crane’s actual chart. Drill the order (configuration, radius, cell, deductions) until it is reflex, because the exam questions are built to punish shortcuts, and so are cranes.
Verified requirements
| Where | Expires | Renewal | Continuing education |
|---|---|---|---|
| United States (federal) | Yes | 5 years | Confirm with issuer |
| California | Yes | 5 years | Confirm with issuer |
| Washington | Yes | 5 years | Confirm with issuer |
Information comes from issuing-authority sources. Confirm current rules, fees and eligibility with the authority before acting.